In chapter 2 of Python Tutorial, we will learn about Variables and it’s Data Types
Python is object oriented programming language so every variable that is created is an object. To create a variable, a value has to be assigned to them and Voila! a Variable is created. Here is an example of a variable:

As you can see above, a variable is created by assigning a value and then, printing out the output using the variable.
There is no need to declare variables prior to using them. Additionally, you do not need to declare the data type of the variable in Python, unlike other programming languages.
We will learn more about what variables are and different data types of variables. For your reference, below is the list of built-in data types in Python:
| Types | Data Types |
| Numeric | int, float, complex |
| Text | str |
| Sequence | list, tuple, range |
| Mapping | dict |
| Set | set, frozenset |
| Boolean | bool |
| Binary | bytes, bytearray, memoryview |
| None | None |
To keep this chapter 2 tutorial as simple as possible, we will go over a few basic types of variables.
Numeric
In Python, three types of numbers are supported – integers(whole numbers), floating point numbers(decimals) and complex numbers.
The syntax for defining an integer is as follows:

Now, let’s define a floating point number by using the following syntax:

If you want to convert an integer to float number or vice versa, you may use below syntax:

As you can see above, we converted an integer to float and, also float to an integer by using the built-in data types “int” and “float” and printing the output on the right hand screen.
Strings
Let’s learn about another data type, which is String. Strings in Python is a group of characters surrounded by either single quotes, or double quotes.
‘Hello World’ is same as “Hello World”. Let’s look at an example and print the output using print() function.

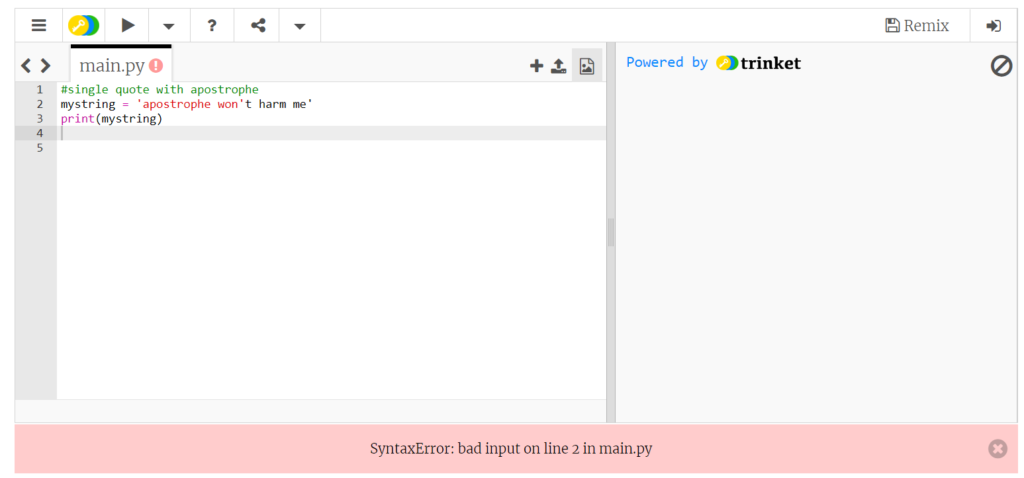
It is advisable to use double quotes instead of single quotes. This is because if your text includes apostrophes then it would terminate the string and your code might run into error. Let’s look at an example:
Single quote with apostrophe:

Double quote with apostrophe:

As you can see above, we ran into issues when using single quotes around a text which has an apostrophe. With double quotes, we were able to successfully execute the code.
As mentioned earlier, we are trying to keep the tutorial as simple as possible, hence, we will not include things such as backslashes, Unicode characters, etc..,. You can learn more about them in Python documentation. If possible, we will try to cover these in the future.
If you would like to assign multiple variables on the same line simultaneously, that can be done as shown below:

Assignment:
The target of this assignment is to create a string, an integer, and a floating point number variables. The string named mystring should contain the words “Hello Python”. The floating point number named myfltpt should contain the floating number 9.0, and the integer named myintr should contain the number 27.
In the below IDE, make changes to the code and click “Run” to execute the code.
If you are stuck, you can click on “Solution” and, then click on “Run” to execute the code successfully. Please use the “Solution” option only after giving your best shot at resolving the assignment.
        #make changes to this code
        mystring =
        myintr =
        myfltpt =

        #after making desired changes, click on Run to test the below code
        if mystring == "Hello Python" and myintr == 27 and myfltpt == 9.0:
            print(mystring, myintr, myfltpt)
        #make changes to this code
        mystring = "Hello Python"
        myintr = 27
        myfltpt = 9.0

        #after making desired changes, click on Run to test the below code
        if mystring == "Hello Python" and myintr == 27 and myfltpt == 9.0:
            print(mystring, myintr, myfltpt)
P.S: Don’t worry about the “if” statement, “and” operator mentioned in the assignment, we will learn about them in upcoming tutorials.
That brings to the end of chapter 2 of Python tutorial, see you in the next tutorial!!!
By the way, if you haven’t installed Python and Pycharm IDE on your Windows laptop, you can visit the below links to learn on how to install and configure/install Python and Pycharm IDE on Windows OS. This might be helpful in understanding the Python language easier.
How to Install Python 3 and Pycharm IDE on Windows
How to configure Pycharm IDE and “Run” your first Python 3 program
For your reference, to download Pycharm IDE, visit below link:
https://www.jetbrains.com/pycharm/download/?section=windows
However, if you don’t want to go through installation process, you can practice your learnings on this page itself by using integrated Python IDE above.
If you have any questions or comments about chapter 2 of Python tutorial, please let us know in the comments section below.

